
Here will be discussed bandwidth management of the speedy, so the ADSL modem
RJ45 cable down and go to LAN CARD computers that have been installed Mikrotik.
The reason is because it is very easy to use, and computer spec's are in need
also friends.
installation process:
The first thing to prepare is a computer server at a minimum with
specification:
* PII processor
* Memory 128
* NIC (LANCARD) 2 pieces
* Hardisk 1GB
* CDroom
* Begin mikrotik download, download ISO here:http://www.mikrotik.co.id/getfile.php?nf=mikrotik-3.4.iso
* Then burn the CD, Burning Image
* After that, insert the cd which had been loaded into the computer server mikrotik
* then Turn On computer.
* Wait until the computer appear as below:

After that press the 'a' (without quotes) to install all facilities contained on mikrotik
Porses let alone run, because the installation is in progress, ranging from formatting the disk until the installation is complete, if the display appears as in below then the installation has been completed.

Once the process is complete, download the tool was built mikrotik, (Winbox) can be downloaded here: http://www.mikrotik.co.id/getfile.php?nf=winbox-2.2.11.exe
After that plug the cable from the ADSL modem to one computer Lan Card which has been installed mikrotik
Then the second LanCard into a hub / swicth to the local network.
Installation has been completed, now the remote server computer that has been in installations on the Winbox that we downloaded, using other computers

Select a router that we had installed, its default identity mikrotik, username admin, password blank

Select the menu interface, if it has been running correctly, it will appear 2
fruit lancard interface.
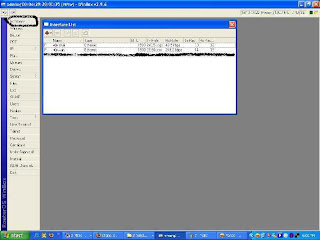
Double-click on any interface that refers to the local and name the Local

In the same way, referring to the modem interface named Public
After that, select the IP address

Views like i appear below, then press the plus button in the corner of it left +
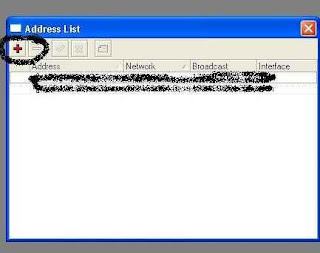
Add the IP addresses, eg
Speedy modem IP is 192.168.1.1, then on MikroTik IP: 192.168.1.2/24
and name
Then press the plus + button in the left corner, and then add the IP
The other Lancard his address:
· For example Ip at the local 10.10.10.1, then enter the IP address
10.10.10.1/27, figures / 27 to 30 host IP, you can learn
more about the concept of subnetting here:
The basic concept of IP address: http://www.forummikrotik.com/beginnerinstallation/
153-konsep-dasar-ip-address.html
· Concept Subneting: http://www.forummikrotik.com/beginnerinstallation/
155-konsep-subnetting-siapa-takut.html
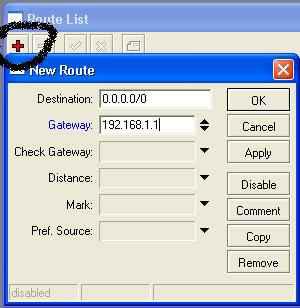
after it select the IP and then select the sub menu Routes
after it select the IP and then select the sub menu Routes

Then enter the IP gateway, by pressing the plus button + in
her left hand corner is the IP of the modem is 192.168.1.1, then press the OK button
After all the above steps completed, the next step is to fill in DNS
menu by selecting IP> DNS

Select Settings and enter the IP dns, with the primary DNS 202.134.1.10
(default speedy) the second secondary DNS 202.134.0.155 (DNS speedy)

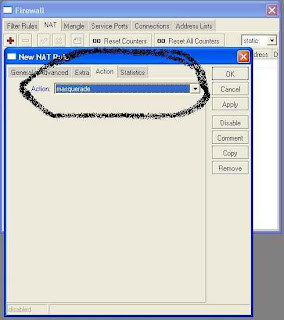
Once completed the final stage you have to do, namely to make the rule be in use locally. This stage is very important, where communication lancard 1 with lancard 2 put here. The essence of the above settings are in this stage, until then do not mistaken.
Choose IP> Firewall> NAT> General

Chain = srcnat, Out interface = Publik (interface which we have been given public name) and then select action = masquerade and then press the OK button to end.
Restart the router by pressing the New Terminal, then typed script system reboot, and press Y

Once finished restart your view how do check ping, go to the New terminal at the gateway 192.168.1.1 ping, ping the DNS 202.134.1.10, if it does replay mean the router is OK
[admin@rt/rw_2] > ping 202.134.1.10
202.134.1.10 64 byte ping: ttl=60 time=60 ms
202.134.1.10 64 byte ping: ttl=60 time=62 ms
202.134.1.10 64 byte ping: ttl=60 time=80 ms
202.134.1.10 64 byte ping: ttl=60 time=77 ms
202.134.1.10 64 byte ping: ttl=60 time=77 ms
8 packets transmitted, 8 packets received, 0% packet loss
round-trip min/avg/max = 60/73.5/80 ms
[admin@rt/rw_2] >
If there Riquest Time Out, review your brarti on your router or on your lancard, or on your modem, or on your connections with the speedy
Now the installation can be completed in say, live IP forwarding to all clients starting from 10.10.10.2 and 10.10.10.30 setersunya up because we created earlier subnets 30 hosts.
RJ45 cable down and go to LAN CARD computers that have been installed Mikrotik.
The reason is because it is very easy to use, and computer spec's are in need
also friends.
installation process:
The first thing to prepare is a computer server at a minimum with
specification:
* PII processor
* Memory 128
* NIC (LANCARD) 2 pieces
* Hardisk 1GB
* CDroom
* Begin mikrotik download, download ISO here:http://www.mikrotik.co.id/getfile.php?nf=mikrotik-3.4.iso
* Then burn the CD, Burning Image
* After that, insert the cd which had been loaded into the computer server mikrotik
* then Turn On computer.
* Wait until the computer appear as below:

After that press the 'a' (without quotes) to install all facilities contained on mikrotik
Porses let alone run, because the installation is in progress, ranging from formatting the disk until the installation is complete, if the display appears as in below then the installation has been completed.

Once the process is complete, download the tool was built mikrotik, (Winbox) can be downloaded here: http://www.mikrotik.co.id/getfile.php?nf=winbox-2.2.11.exe
After that plug the cable from the ADSL modem to one computer Lan Card which has been installed mikrotik
Then the second LanCard into a hub / swicth to the local network.
Installation has been completed, now the remote server computer that has been in installations on the Winbox that we downloaded, using other computers

Select a router that we had installed, its default identity mikrotik, username admin, password blank

Select the menu interface, if it has been running correctly, it will appear 2
fruit lancard interface.

Double-click on any interface that refers to the local and name the Local
In the same way, referring to the modem interface named Public
After that, select the IP address

Views like i appear below, then press the plus button in the corner of it left +

Add the IP addresses, eg
Speedy modem IP is 192.168.1.1, then on MikroTik IP: 192.168.1.2/24
and name
Then press the plus + button in the left corner, and then add the IP
The other Lancard his address:
· For example Ip at the local 10.10.10.1, then enter the IP address
10.10.10.1/27, figures / 27 to 30 host IP, you can learn
more about the concept of subnetting here:
The basic concept of IP address: http://www.forummikrotik.com/beginnerinstallation/
153-konsep-dasar-ip-address.html
· Concept Subneting: http://www.forummikrotik.com/beginnerinstallation/
155-konsep-subnetting-siapa-takut.html
after it select the IP and then select the sub menu Routes
after it select the IP and then select the sub menu Routes

Then enter the IP gateway, by pressing the plus button + in
her left hand corner is the IP of the modem is 192.168.1.1, then press the OK button
After all the above steps completed, the next step is to fill in DNS
menu by selecting IP> DNS

Select Settings and enter the IP dns, with the primary DNS 202.134.1.10
(default speedy) the second secondary DNS 202.134.0.155 (DNS speedy)

Once completed the final stage you have to do, namely to make the rule be in use locally. This stage is very important, where communication lancard 1 with lancard 2 put here. The essence of the above settings are in this stage, until then do not mistaken.
Choose IP> Firewall> NAT> General

Chain = srcnat, Out interface = Publik (interface which we have been given public name) and then select action = masquerade and then press the OK button to end.

Restart the router by pressing the New Terminal, then typed script system reboot, and press Y

Once finished restart your view how do check ping, go to the New terminal at the gateway 192.168.1.1 ping, ping the DNS 202.134.1.10, if it does replay mean the router is OK
[admin@rt/rw_2] > ping 202.134.1.10
202.134.1.10 64 byte ping: ttl=60 time=60 ms
202.134.1.10 64 byte ping: ttl=60 time=62 ms
202.134.1.10 64 byte ping: ttl=60 time=80 ms
202.134.1.10 64 byte ping: ttl=60 time=77 ms
202.134.1.10 64 byte ping: ttl=60 time=77 ms
8 packets transmitted, 8 packets received, 0% packet loss
round-trip min/avg/max = 60/73.5/80 ms
[admin@rt/rw_2] >
If there Riquest Time Out, review your brarti on your router or on your lancard, or on your modem, or on your connections with the speedy
Now the installation can be completed in say, live IP forwarding to all clients starting from 10.10.10.2 and 10.10.10.30 setersunya up because we created earlier subnets 30 hosts.
Very informative post. Keep up the good work. I would really look forward to your other posts
ReplyDeleteDell - Refurbished - 13" Latitude Notebook - 2 GB Memory - 320 GB Hard Drive
Dell - Refurbished - 13" Latitude Notebook - 4 GB Memory - 320 GB Hard Drive (E4310)